Here's the recipe of #8, also found HERE:
- 5lb White wheat malt
- 5lb 2 row
- 10oz crystal 10L
- 10oz munich 10L
- 1/2lb Carapils
Mashed at 152 for 60min
1.2oz Hallertauer for 30min
2 TBS corn starch for 10min
0.375oz coriander for 10min
1.5oz Frontier dry orange peels for 10min
Fermented at 65F for 2 weeks with S05.
Numbers:
OG=1.053
FG=1.006
ABV%=6
IBU=14
SRM=6
The use of munich malt was a mistake. I though I was using crystal 10 and after 10oz was milled I realized the mistake, so I stopped and milled another 10oz of crystal 10.
I had plans to add some wheat gluten but decided to mix it with water first before adding to the boil. Good that I did the test because the gluten turned into a big rubber ball and would probably mess up my batch. Lesson learned, no gluten!
The boil was only 30min and did not use irish moss in an attempt to increase chill haze. The beer came out very cloudy and thick, just as I wanted.
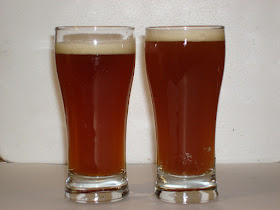
I did a side by side test today and honestly, color is so close one can't tell the difference. Body is also very close and taste wise, yes, best match so far.
Here's a side by side photo, clone is on the left
Head retention after 1min, looks better on the clone.
And the lacing on the clone was awesome.
Craft brewing, with a hint of science. Homebrewing in Seattle WA, the evergreen state, also known as one of the largest hop farming in the world. Here you will find recipes, instructions to start homebrewing beer and other technical articles.
Pages
▼
Sunday, December 23, 2012
Thursday, December 20, 2012
Mac and Jack's African Amber Clone update 2
Update 4/22/13: Full list of recipes can be found here.
Got some beer from a local store to make a side by side comparison, here are the results:
Clone is on the left.
Findings:
Color - Seems that clone is lighter, but almost undetectable
Aroma - Same
Head retention - Same
Flavor - Clone tastes sweeter, more malty flavor, quite less bitter, which may be due to the extra sweetness. The bitterness sticks to the tongue much longer on the real than the clone.
Body - Same
If I would correct the recipe, it would probably get an extra 1/2oz of hops for 60min and remove the lactose. I however, like the clone better than the real, just my taste.
Note: Measured gravity of the beer, just for the sake of it, Clone=9.0 and real=8.0 brix.
I finished my glass and had to post a pick of the lacing on the clone.
Thursday, December 13, 2012
Mac and Jack's African Amber Clone update
Update 4/22/13: Full list of recipes can be found here.
Here's the beer in details. I'm not an expert and don't drink this beer very often, but from what I can tell, VERY close!!
10lb Briess Pale ale
1lb Carapils
1lb Crystal 80
1lb Munich 10
mashed at 160 for 1h
3/4oz Centennial for 60min
1/2oz Cascade for 15min
1/2oz Cascade for 0min
1/2lb Lactose for 10min
1 TBS wheat gluten for 10min (mixed with lactose)
1oz Cascade dry hop in the keg
Yeast Wyeast 1098 British Ale fermented at 65F
OG=1.062
FG=1.019
IBU=28
SRM=14
ABV%=5.5
Will do a blind test soon.
Update here
Wednesday, December 12, 2012
All Grain
You probably know by now that brewing beer is very simple and it basically requires a source of sugars to be fermented. The majority of sugar used in brewing are from barley malt, that are available to home brewers in different forms, as malt extract (liquid or dry) or by mashing the barley malt at home to transform the starch within into sugars.
The process which involves only mashing as the main source of sugars is called all grain and briefly describe on this post.
Here are few points that I believe encourage home brewers to move on to all grain:
- Large variety of malts available, allowing brewers to compose their recipes as they please, making minor adjustments to reach their targets.
- Possibility of brewing very light beers
- Cheaper than malt extract brewing, specially when buying base malts in bulk
- Long term storage of grains allow brewers to avoid repeated trips to brew stores, sometimes located far way or inaccessible during harsh winters.
Note that adding adjuncts like wheat, oats, corn flakes or even sugars like honey, lactose and dextrin would still be considered all grain brewing, as long it doesn't represent a large percentage of the grain bill. I don't think there is a threshold for this.
Anyways, if moving to all grain brewing, the main piece of equipment you will need is a mash tun. you can buy one ready from you LHBS or build one yourself, as many home brewers do. All it takes is a cooler that is about twice the volume of your batches and some easy modifications. The purpose of a mash tun is to hold the barley malt and hot water for about an hour until the proper enzymatic conversion of starches into sugars are achieved. The enzymes are already present in the barley malt and are activated when soaked in hot water from 150 to 160F. Depending on the exact temperature within this range, the sugars created can be of longer or shorter molecule chains. If short, the yeast will be able to easily convert it to alcohol and CO2. if long chain sugar, the yeast will not convert it all and residual sweetness will remain in the beer, which may or may not be appropriate depending on the beer style one is brewing.
Here are few options for a mash tun:
Round Cooler: this is a small 2 gals cooler I modified just for testing. It can be scaled up to a 10gal cooler easily. This is the most popular design I have seen.
The mash tun needs a system to be able to drain the wort and leave the gains behind. Some use a false bottom, some use a ss braid as shown here.
This is the system to re-circulate the wort, so the grain bed tights and allow a clear wort to be drained.
Here's a different cooler setup.
Basically, the all grain process resumes to these steps:
- Elaborate the recipe and mill the grains. It can be done at home if you have a grain mill, or at your LHBS which usually do not charge anything.
- Heat water to strike temperature, which is calculated based on the batch size, amount of grains, temperature of the grains and other factors. Basically, you heat water so when you mix the grains it will stabilize on your target mashing temperature (anything you selected between 150 to 160F). There are online tools that include strike water calculators. My toll, developed in excel does that also and can be found here. The tricky thing about striking water calculators though is that it is dependent on factors that are particular to your system, like heat absorption of your cooler walls for example. If you stick with one cooler model and find out that the calculator is 3F off the real deal, you can just offset the results for future brews.
- Dump the heated water to your mash tun.
- Mix in the grains
- Take a measurement of your real mashing temp. That is right after mixing the grains. Until you dial in your system response it is always advisable to have some boiling and cold water available for last minute adjustments. If you miss the target by too much, let's say you get 145F instead of planned 152F, just add some boiling water in small steps, mixing well and taking new measurement until you reach 152F. Same as if you ended up above the target. Just add cold water to adjust as needed. Again, once you know your system, easy correction can be applied to the striking water calculations to zero in on your target mashing temperature. After 1h and before start re-circulating the wort, take another pick to see how much the temperature dropped. Ideally, you would like as low temp drop as possible. If your mash tun drops more than 5F in 1h, consider improving its insulating capabilities or getting a better cooler.
- Mash for one hour
- Re-circulate and drain the wort
- Sparge, which is nothing more than washing the grains to extract as many sugars as possible. Batch sparging is the most used I believe and what you do is drain all the wort, close the drain and dump hot water at 165F to the grain bed, mixing well. Then re-circulate the wort until it clears and drain it again. Fly sparging what I do and consists on slowly adding hot water (165F) to the top of the mash tun at the same time at the wort is drained, pretty much keeping the level constant. As the heavier sweeter wort is drained from the bottom of the mash tun, clear, lighter and hotter water is add to the top, pushing downwards washing the grains. Once the volume of wort for your batch is achieved, mashing is interrupted and from this point forward the process is exactly the same as extract brewing. You bring the wort to a boil, adding you hops and any other spices/adjuncts as called by the recipe.
Here's s snapshot of a fly sparging.
Wednesday, December 5, 2012
Nilo's Brewing Tool
Here's a new brewing tool, found HERE (xlsm) or HERE (xls), that I developed in excel (PC), which address few issues I had when using the online brewing tools available today.
Here are the main capabilities that I would highlight:
I can make a netmeeting section to show how to use the tool, probably wait few requests to reach more users at once. Please post a comment if you would like to get a trainning section.
I didn't have the time to write an instruction manual.
Here are few snap shots

Here are the main capabilities that I would highlight:
- Grain, extract, sugars and adjuncts database, including PPG, SRM and fermentability adjustment for Lactose, Dextrin, Carapils, Crystal and highly kilned malts
- Hops database with average range of alpha acids
- Yeast database
- Beer style database from BJCP with OG,FG,SRM,IBU and ABV data
- Mashing temperature input and auto correction for final gravity
- Strike water temperature calculation for single infusion mashing, including grain temperature compensation.
- Recipe database, to store your recipes
- Brewing guide, an easy format to print and follow on brewday with all ingredients, boil schedule, fermentation log, etc
- PH calculator for sparge water adjustment
- Gravity converter and fermentation log
- Tool will comes with all recipes that I have brewed to date (93 batches of partyial mash, extract and all grain)
- Limitations: 8 fermentables (grains, adjuncts, sugars) and 6 hop schedules, 1000 recipes
I can make a netmeeting section to show how to use the tool, probably wait few requests to reach more users at once. Please post a comment if you would like to get a trainning section.
I didn't have the time to write an instruction manual.
Here are few snap shots
Recipes

Design
Brewday
PH calculator
Monday, December 3, 2012
Brewing a Mac & Jack's African Amber Clone
Update 4/22/13: Full list of recipes can be found here.
Just started my first attempt to clone this beer, very appreciated here in the pacific northwest.
After checking few recipes online and based on some feedback from people that love this beer, here's the starting recipe that I'm trying now, happily bubbling at 67F as I type.
10 lb British Pale Ale malt
1 lb Crystal 80L
1 lb Munich 10L
1 lb Carapils
Mashed at 160F for 1h
Boil:
3/4oz Centennial for 60min
1/2oz Cascade for 15min
1/2oz Cascade for 0min
10g wheat gluten for 10min (protein to increase chill haze)
1/2lb Lactose for 10min (bump up residual sweetness)
I'll post results once finished.
Update here
Wednesday, October 10, 2012
Electric Brewing Part2 - Circuit Diagrams
Here are the circuit diagrams for the main circuit and PWM board.
The 12VDC power supply can be any DC adaptor, perhaps those cell charges you have around from old cell phones.
The 12VDC power supply can be any DC adaptor, perhaps those cell charges you have around from old cell phones.
Sunday, September 30, 2012
Electric Brewing
Got tired of spending $15 in propane for each 5gal batch, plus the need to brew indoor during winter.
Decided to build an electric system just to heat water and boil wort, with a 5500W heating element, 240V.
I use a stirring system to minimize scortching and increase efficiency. It is working just fine, I can heat my strike water from 70 to 170F in 10min, boil from 150F in 15min.
One late addition I have to do was a PWM controller to be able to manually control the boil intenssity. This was achieved with a very simple circuit I first used 20 years ago while still in college. It is basically a ramp generator feeding a voltage comparator, in which you control the reference voltage. The duty cycle I use for brewing purpose is about 4s, adustable from 2 to 6s.
I can share the project if anyone is interested.
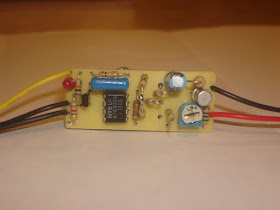
PWM board.
SSR fan, RTD input and load output.
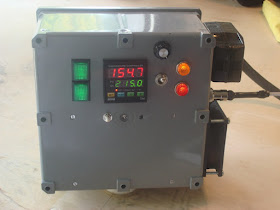
From left to right, dual phase power input green lights, controller, top dial for PWM power control, load on/off switch, load dual phase lights.
Air intake for SSR cooling.
Connected to kettle.
Heating element.
RTD.
Stirring.
Bottom switch is the sound alarm on/off. Shown red light high alarm going off.
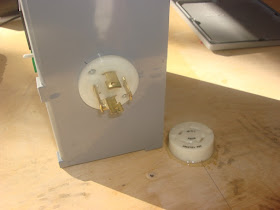
AC power plug.
Guts. Right up corner is a 12VDC switched power supply for the cooling fan and buzz.
Timer.
Clean back, easy access.
Videos:
First test run, showing the boil alarm going off at 210F.
First brew with this system, boil with PWM control.
Decided to build an electric system just to heat water and boil wort, with a 5500W heating element, 240V.
I use a stirring system to minimize scortching and increase efficiency. It is working just fine, I can heat my strike water from 70 to 170F in 10min, boil from 150F in 15min.
One late addition I have to do was a PWM controller to be able to manually control the boil intenssity. This was achieved with a very simple circuit I first used 20 years ago while still in college. It is basically a ramp generator feeding a voltage comparator, in which you control the reference voltage. The duty cycle I use for brewing purpose is about 4s, adustable from 2 to 6s.
I can share the project if anyone is interested.
PWM board.
SSR fan, RTD input and load output.
From left to right, dual phase power input green lights, controller, top dial for PWM power control, load on/off switch, load dual phase lights.
Air intake for SSR cooling.
Connected to kettle.
Heating element.
Stirring.
Bottom switch is the sound alarm on/off. Shown red light high alarm going off.
AC power plug.
Guts. Right up corner is a 12VDC switched power supply for the cooling fan and buzz.
Timer.
Clean back, easy access.
Basically, what this system does is allow me to heat the strike and sparge water to exact temperatures, reach a full boil and control the boil using the PWM power control. I have the controller alarms set to high 210F and low 70F. When alarm high is triggered, light and buzz goes off to let me know that boil is imminent so I can manage it with PWM adjust. The low alarm is used when I'm cooling the wort for pitching, so I know it is cool enough.
Videos:
First test run, showing the boil alarm going off at 210F.
First brew with this system, boil with PWM control.


